Introductory Overview
Next to checkmates with the Queen, simple checkmates with a Rook or two Rooks are the second most common of the types of simple checkmates. Previous tutorials covered the concept of back rank mate. A Rook is particularly well suited (as is the Queen) for dropping this checkmate on the opposing King when he is castled to the Kingside and trapped by his own pawns on the opposing player’s second rank (2nd rank for White, 7th rank for Black). In this Part 1, we first review Rook & King v. King. In Part 2, we will review Two Rooks & King v. King. In Part 3, we will examine Rook, Bishop, & King v. King. Finally, the tutorial concludes with Part 4 examining Rook, Knight, & King v. King. Coverage of the Rook used for checking and checkmating is in the Rook tutorial under Moving Pieces & Advancing pawns, and other tutorials and problems presented at the website.
Rook & King v. King
In order to checkmate with a Rook & King v. King (hereafter “RKK”), the opposing King must be located on a square in either of the two wings of the board (a-file or h-file) or one of the back ranks (1st rank or 8th rank). If the opposing King is located on any other square in the b through g files and in the 2nd through the 7th ranks, the opposing King cannot be checkmated using a Rook & King. Also, a Rook cannot checkmate an opposing King when sandwiched between the Kings, unlike the Queen is able to do because of the Queen’s Bishop power.
The line of play for mating nets using RKK is a coordinated, progressive entrapment of the opposing King using the player’s Rook and King working in combination to force the entrapment, and then entomb the opposing King on the checkmate square.
Generally, the first objective for developing mating nets for RKK endgames is to use the Rook to restrict the number of files (for a checkmate on one of the wings) or ranks (for a checkmate on one of the back ranks) within which the opposing King may move.
The player then brings his King into play in the area of battle – using the King to further restrict the opposing King’s movement.
Then, the player combines successive moves by the player’s Rook & King working in a sustained combined force to continually drive the opposing King into an ever-decreasing area within which the opposing King may move, toward the intended checkmate square.
This maneuvering forces the opposing King toward one of the sides or a corner of the board where the opposing King cannot escape checkmate.
These general aspects of the basic line for developing a mating net and obtaining one of the mating patterns may need to be varied depending on what moves the opposing player makes with his or her Queen. Thus, it might be better for a player to lead off maneuvering with his or her King instead of the Rook. For example, the Rook may already is in a position significantly restricting the opposing King’s movement.
There are three types of mating patterns for checkmating with in RKK endgames.
| 1. | The player’s Rook and the opposing King are in the same wing file with one or more empty squares between them. The player’s King is on a square in the file that is the third file from the wing (c-file for checkmate in the a-file; f-file for checkmate in the h-file), blocking the opposing King’s escape from the checkmate square. In this mating pattern, the player’s King is preventing the opposing King from moving to the three outer squares in the adjoining file for the six square rectangle Anatomy of Mate mating pattern. The player’s Rook is controlling the wing file, attacking (checking) and mating the opposing King. | ||
| 2. | The player’s Rook and the opposing King are in the back rank with one or more empty squares between them. The player’s King is on a square in the rank that is the third rank from the back rank (3rd rank for checkmate on White’s back rank – 1st rank; and 6th rank for checkmate on Black’s back rank – 8th rank), blocking the opposing King’s escape from the checkmate square. In this mating pattern, the player’s King is preventing the opposing King from moving to the three outer squares in the adjoining rank for the six square rectangle Anatomy of Mate mating pattern. The player’s Rook is controlling the back rank, attacking (checking) and mating the opposing King. | ||
| 3. | The opposing King is in a corner square. The player’s King is blocking the opposing King from moving to the two outer squares of the four square Anatomy of Mate mating pattern. The player’s Rook is controlling either the back rank or the file ending in the corner square, attacking (checking) and mating the opposing King. In this mating pattern, the player’s King must be located on one of three squares relative to the corner square in order for the player’s Rook to be able to checkmate. |
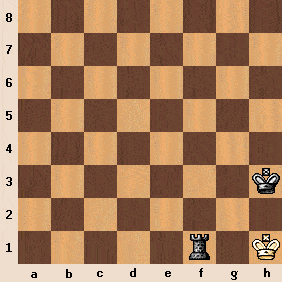
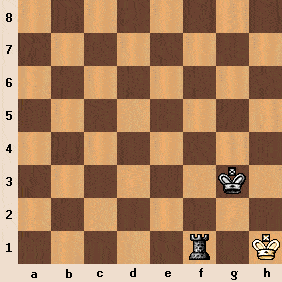
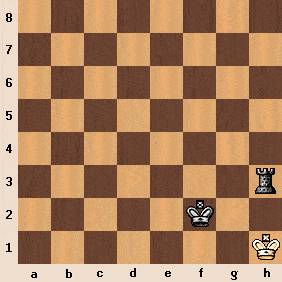
The six diagrams below show examples of these three patterns for RKK simple checkmates.
The first two diagrams below show mating patterns for RKK in the a-file (mating pattern type #1 above), and on the 1st rank (mating pattern type #2 above). The following four diagrams depict mating patterns from the three possible positions for the player’s King for RKK mates with the opposing King on a corner square (mating pattern type #3 above).
| DIAGRAM: RKK #1 Checkmate in a-file 
|
DIAGRAM: RKK #2 Checkmate in 1st rank 
|
| DIAGRAM: RKK #3 Checkmate on corner square Ex.1 
|
DIAGRAM: RKK #4 Checkmate on corner square Ex.2 
|
| DIAGRAM: RKK #5 Checkmate on corner square Ex.3 
|
DIAGRAM: RKK #6 Checkmate on corner square Ex.4 
|
The three mating patterns for RKK mates all bring into play the power of the player’s King to prevent the opposing King from moving to the squares around the square upon which the player’s King is located. This power of the King is the bedrock foundation for the principle of King Opposition, which plays a very important role in these mating patterns. The principle has other very important tactical & strategic aspects, and is reviewed more extensively in other tutorials. For now, the two primary aspects of the principle that apply in RKK mating nets and mating patterns are:
| 1. | Direct King Opposition. Kings aligned parallel on squares separated by one file, or on squares separated by one rank, or on squares separated by one square along a diagonal line. However, alignment along a diagonal line cannot be used for checkmating in a RKK endgame. The reason for this is that the player’s King would not be controlling the two outer squares in the four square Anatomy of Mate mating pattern. The opposing King therefore would always have a flight square available in a diagonal alignment situation. Direct King Opposition is employed in the mating patterns shown in diagrams 1 through 4 above. | ||
| 2. | Misaligned King OppositionKings are on squares that are not aligned parallel to each other, but separated by one square; however, not necessarily with an intervening file or rank. This type of King Opposition can be used only for checkmating an opposing King on a corner square in RKK endgames. When an opposing King is on a corner square and in Misaligned King Opposition with the player’s King located two squares away in the adjacent file or rank, then Direct King Opposition is forced if the opposing King is able to move to adjacent square. Misaligned King Opposition where the opposing King cannot move to the adjacent square, hence checkmate, is shown in diagrams 5 & 6 above. |
The next diagram shows Misaligned King Opposition with Black’s King already on a corner square – a8.
However, White’s Rook is slightly out of position to deliver the knockout attack – checkmate.
The White player therefore still needs to do some maneuvering. White can deliver checkmate without having to move White’s King. Black’s King can only move to b8, which will bring the Kings into Direct King Opposition.
DIAGRAM
MISALIGNED KING OPPOSITION

Using the position shown above for Misaligned King Opposition diagram, let’s examine three test questions.
With Black to move what is the fewest number of moves, that White needs to make to mate Black’s King? With White to move, what is the fewest number of moves that White needs to make to mate Black’s King? With White to move, if White misses the possible opening moves for mating in the fewest number of moves, then what is the next fewest number of moves in which White can mate Black’s King? Answers: White can mate in two with only one possible mating net if Black has the move. White can mate in two with six possible mating nets if White has the move. White can mate in three with twelve possible mating nets if White misses one of the mates in two lines above. The lines are:
With Black to move what is the fewest number of moves, that White needs to make to mate Black’s King?
With White to move, what is the fewest number of moves that White needs to make to mate Black’s King?
With White to move, if White misses the possible opening moves for mating in the fewest number of moves, then what is the next fewest number of moves in which White can mate Black’s King?
Answers: White can mate in two with only one possible mating net if Black has the move. White can mate in two with six possible mating nets if White has the move. White can mate in three with twelve possible mating nets if White misses one of the mates in two lines above. The lines are:
Black to move: White can mate in two with 1…Kb8 2.Rc5 Ka8 3.Rc8#
White to move: White can mate in two with:
| First: | 1.Kc7 Ka7 2.Ra5# | |
| Second: | 1.Rd5 Kb8 2.Rd8# | |
| Third: | 1.Re5 Kb8 2.Re8# | |
| Fourth: | 1.Rf5 Kb8 2.Rf8# | |
| Fifth: | 1.Rg5 Kb8 2.Rg8# | |
| Sixth: | 1.Rh5 Kb8 2.Rh8# |
With White to move, if White misses the possible opening moves above for mating in the fewest number of moves: White can mate in three with six possible opening moves for mating nets not using the six opening moves in the lines above. Using the opening moves from the above lines, White also can mate in three with six possible mating nets. Therefore, White would have a total of twelve possible mating nets, presuming White did not do something unexpected and odd on White’s first move.
| First: | 1.Ra5# Kb8 2.Rc5 Ka8 3.Rc8# | |
| Second: | 1.Rb4 Kb8 2.Rc4 Ka8 3.Rc8# | |
| Third: | 1.Rb3 Kb8 2.Kc3 Ka8 3.Ka8# | |
| Fourth: | 1.Rb2 Kb8 2.Rc2 Ka8 3.Rc8# | |
| Fifth: | 1.Rb1 Kb8 2.Kc1 Ka8 3.Ka8# | |
| Sixth: | 1.Rc5 Kb8 2.Rc6 (or Rc7) Ka8 3.Rc8# | |
| Seventh: | 1.Kc7 Ka7 2.Rb6 Ka8 3.Ra6# | |
| Eighth: | 1.Rd5 Kb8 2.Rc5 Ka8 3.Rc8# | |
| Ninth: | 1.Re5 Kb8 2.Rc5 Ka8 3.Rc8# | |
| Tenth: | 1.Rf5 Kb8 2.Rc5 Ka8 3.Rc8# | |
| Eleventh: | 1.Rg5 Kb8 2.Rc5 Ka8 3.Rc8# | |
| Twelfth: | 1.Rh5 Kb8 2.Rc5 Ka8 3.Rc8# |
Now let’s examine a slightly different board position, just before the above position and see what options are available to White.
DIAGRAM
MISALIGNED KING OPPOSITION
One Move Before

From this position, currently Black’s only move is to a7, regardless whether Black or White has the move. Looking at the position of the pieces and the squares they are located on, and applying basic principles, we can construct an important “positional” consideration if White has the move.
With Black’s King already in the corner square a8, White cannot force the Kings into Direct King Opposition with Black’s King in the a-file for mate in either two or three if Black has the move. This is because the Rook does not have the Bishop’s power to control diagonals like the Queen.
Now let’s analyze the position shown, first with White to move and then with Black to move.
With White to move, White can mate in three only with 1.Kb6, bringing the Kings into Misaligned King Opposition.
1.Kb6 Kb8 2.Rc5 Ka8 3.Rc8#
With Black to move, then White cannot mate in three or four, but can mate in five, and force mate in six.
1…Ka7 2.Rb6 {White applies the fundamental principle for checkmating – “Restrict(or limit) the opposing King’s movement at all times.” If White did something else, Black’s King would have greater mobility. For example, if 1.Kc6, then Black could move Ka6 in reply thereby making White’s job of checkmating slightly more difficult.} 2…Ka8 3.Kc6 Ka7 {Now in this position, White employ’s The Principle of Retreat (was covered under the Queen Simple Checkmates tutorial and is reviewed further later in this tutorial), making a retreating move that forces the opposing King to a bad square,} 4.Rb4!{White also could do Rb3, Rb2, or Rb1 and accomplish the same goal. Black has only two options 4…Ka6 and 4…Ka8} 4…Ka6 {bringing the two Kings into Direct King Opposition, allowing White’s Rook to do an opportunistic checkmate – a mate that occurs earlier than mate could be forced upon the opposing King} 5.Ra4# 4…Ka8 5.Kc7 {forces Black’s King to the checkmate square and bringing the two Kings into Direct King Opposition, allowing White’s Rook to checkmate} 5…Ka7 6.Ra4#
If White has the move, White also can force mate in the a-file using Direct King Opposition, although White will have to maneuver the Rook to do so. White is able to do so in the next fewest number of moves…mate in four. White has several opening moves available that will develop mating nets for mate in four from the position shown above. In each of these mating nets, White will mate in the a-file. The opening moves to develop the mating nets for mate in four are Rb4, Rb3, Rb2, Rb1, Kb6, Kd6, and Kc6. Try to work out the mates in four applying the basic principles. Try to work out the mates in four applying the basic principles. You should quickly be able to do so. The solutions are in Appendix A at the end of this tutorial if you become stumped.
From the above principles and aspects, it is possible then to construct three methods to develop mating nets and accomplish mate with RKK.
| 1. | Force the opposing King into one of the four corners where the Rook delivers the checkmate along a wing file or a back rank. The player’s King is able to block and take away the other two escape squares in the four square anatomy of mate pattern. The player has a choice of multiple possible squares on which to locate the player’s King.
|
||||||||||||||||||||||
| 2. | For checkmate in one of the two wings, a-file, or h-file, align the two Kings parallel on squares in the same rank, but two files apart. The Rook delivers checkmate from a distance – separated from its King and the opposing King – located on a square in the same file as the opposing King except square adjacent square to the one on which the opposing King is located. Only one file can separate the wing file in which the opposing King is located and the file in which the player’s King is located. Therefore, for checkmate in the a-file, the player’s King must be located in the c file. For checkmate in the h-file, the player’s King must be located in the g-file. | ||||||||||||||||||||||
| 3. | For checkmate in one of the two back ranks, align the two Kings parallel on squares in the same file, but two ranks apart. The Rook delivers checkmate from a distance – separated from its King and the opposing King – located on a square in the same rank as the opposing King except the square adjacent to the one on which the opposing King is located. Only one rank can separate the rank in which the opposing King is located and the rank in which the player’s King is located. Therefore, for checkmate in White’s back rank (1st rank), the player’s King must be located in the 3rd rank. For checkmate in Black’s back rank (8th rank), the player’s King must be located in the 6th rank. |
The player needs to be on the lookout for two important aspects while maneuvering a mating net to obtain one of the three mating patterns with RRK endgames.
| 1. | Prevent lining up the King and Rook in such a way as to give the opposing King a flight path back toward the center of the board; and | ||
| 2. | Ensure the opposing King always has a square to move to until the final checkmate move to prevent a stalemate. |
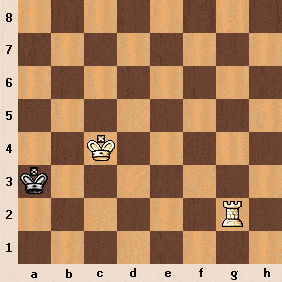
Let’s look at a diagram of another board position and apply the principles to checkmate the opposing King. White to Move. Can White mate in two? Can White mate in three?
DIAGRAM
MISALIGNED KING OPPOSITION
A Different Position

Answer: Yes to both questions.
Mate in 2: 1.Rc2 (or Rd2, Re2, Rf2, or Rh2) {White employs what I call “The Principle of Short Positioning” with 1.Rc2, 1.Rd2, 1.Re2, or 1.Rf2. This principle employs the tactical & strategic maneuver of moving a piece to an intervening square in a direct line (along a rank, file, or diagonal) toward the opposing King. The maneuver is intended to obtain some advantageous goal (e.g. avoid a stalemate but keeping the opposing King’s mobility restricted, or forcing the opposing King to a bad square, which could be the checkmate square). As part of the mating net in this example, White moves to an intervening square to drive the opposing King to a bad square – the checkmate square a4.
However, White’s possible opening move for the mating net of 1…Rh2 is an example of “The Principle of Retreat” – the player uses a retreating move to accomplish some advantageous goal as occurs in The Principle of Short Positioning. Both The Principle of Short Positioning and The Principle of Retreat are always sub-principles of “The Principle of Intermediate Move,” but not the vice-versa. The Principle of Intermediate Move is when a player makes a move that puts a piece (or pawn) on a square, which thereby forces the opposing player to make a disadvantageous move with a piece (e.g., forcing the opposing King move to a bad square), or a disadvantageous pawn advance. Additionally, each of these principles often can be used to permit the player to prevent stalemating the opposing King. These principles are premised upon the foundational basis of Zugzwang – a situation on the board where due to the positioning of the pieces (and/or pawns), a player who is not under an actual, immediate, direct threat must nevertheless weaken his or her position because he or she has the move.} 1…Ka4 {Black’s King forced to a bad square – the checkmate square a2} 2.Ra2#
Mate in 3: 1.Kc3 Ka4 2.Rg5 {This is an example of the application of The Principle of Intermediate Move, but of neither The Principle of Intervening Move nor The Principle of Retreat. White restricts (limits) the Black King’s mobility, forcing him to a bad square – the checkmate square a3} 2…Ka3 3.Ra5#
In studying and working through basic endgame mating nets and analyzing mating patterns to learn and understand them, hopefully you come to the realization that there are discernable common pattern themes to develop the combinations necessary for move order & calculation to be able to mate as quickly as possible. While the positions used in this tutorial (and shown further by the solutions presented on the next page in Exhibit A for the alternative mates in four for the Misaligned King Opposition, One Move Before board position) are very simple, mating in RKK endgames (as in all basic endgames) from different board positions is no different.
Some RKK endgames may take many moves to efficiently mate in the fewest moves possible. If a player working through a RKK endgame mating net does not make a blunder or mistake, the opposing player simply will not be able to gain a draw or a stalemate, regardless of the position on the board. Applying the basic principles allows a player to do the move order & calculation, regardless of the position. The player therefore will advance beyond the beginner’s tendency of trying to figure it while randomly moving around the board, which increases the chances the opposing player will gain a draw or stalemate. In the next part of the tutorial, we will examine Two Rooks & King v. King. Tutorial links are below Exhibit A.
Solutions for mates in four to the Misaligned King Opposition One Move Before board position.
Making first move with Rook:
1.b4 (or 1.b3, 1.b2, and 1.b1) {yields the following mating net} 1…Ka7 2.Kc6 Ka8 {if 2…Ka5 then 3.Ra5# opportunistic checkmate} 3.Kc7 Ka7 4.Ra4#
Making first move with King:
1.Kb6 Kb8 2.Rc5 Ka8 3.Rd5 {seems kind of foolish though when 3.Rc8# will accomplish mate quicker} 3…Kb8 4.Rd8#
1.Kd6 Ka7 2.Kc7 Ka6 3.Rc5 {or Rd5, Re5, Rf5, Rg5, and Rh5} 3…Ka7 4.Ra5#
1.Kc6 Ka7 2.Kc7 Ka6 3.Rc5 {or Rd5, Re5, Rf5, Rg5, and Rh5} 3…Ka7 4.Ra5#
